
OPENSOURCE NETWORK BACKUPS FOR OVER 120 NETWORK DEVICES
Oxidised is a network device configuration backup tool which was developed to be a replacement for Rancid. Oxidized is written in the Ruby programming language and is very extensible and supports over 120 operating system types.
Alex will go through running, installing and configuring Oxidized to enable the collection of configs from Juniper EX’s Switch’s. These configurations will then be stored on a Gitlab account for version control.
OXIDIZED HIGHLIGHTS:
- Automatically adds/removes threads to meet configured retrieval interval
- Restful API to a move node immediately to head-of-queue (GET/POST /node/next/[NODE])
- Syslog udp+file example to catch config change events (IOS/JunOS) and trigger a config fetch
- Will signal which IOS/JunOS user made the change, can then be used by output modules (via POST)
- The git output module uses this info – ‘git blame’ will show who changed each line, and when
- Restful API to reload list of nodes (GET /reload)
- Restful API to fetch configurations (/node/fetch/[NODE] or /node/fetch/group/[NODE])
- Restful API to show list of nodes (GET /nodes)
- Restful API to show list of version for a node (/node/version[NODE]) and diffs
THERE ARE A NUMBER OF INSTALLATION METHODS AVAILABLE FOR THIS TOOL, INCLUDING BUILDING FROM SOURCE, RUBY GEMS AND ALSO DOCKER CONTAINERS
For this blog I will be using the Docker container as we run multiple Docker containers within Axians PS Lab.
First we need to create a configuration directory on the host system:
mkdir /home/axians/lab-host/oxidized
We then need to run the container for the first time to initialize the configuration:
Note: this step is only required for creating the Oxidized configuration file and can be skipped if you already have one.
docker run --rm -v /home/axians/lab-host/oxidized:/root/.config/oxidized -p 8888:8888/tcp -t oxidized/oxidized:latest oxidized
You should get the following output:
axians@axians:~/lab-host/oxidized$ docker run --rm -v /home/axians/lab-host/oxidized:/root/.config/oxidized -p 8888:8888/tcp -t oxidized/oxidized:latest oxidized
Unable to find image 'oxidized/oxidized:latest' locally
latest: Pulling from oxidized/oxidized
c64513b74145: Pull complete
01b8b12bad90: Pull complete
c5d85cf7a05f: Pull complete
b6b268720157: Pull complete
e12192999ff1: Pull complete
d39ece66b667: Pull complete
65599be66378: Pull complete
e9876d13469e: Pull complete
950007a6374b: Pull complete
a984980ba6a9: Pull complete
3a0d8dcf44da: Pull complete
09990a0f703c: Pull complete
0db6d82bf294: Pull complete
c6a965a221ba: Pull complete
450d5e516083: Pull complete
bab66af4c4a4: Pull complete
0de7c68519b4: Pull complete
13a57a4e8cc5: Pull complete
941fa46b3540: Pull complete
736f8438e0d0: Pull complete
Digest: sha256:ec63031b64183c0f3486737d18cc6cc0bf3d30e36fff34d6a4ae53c88177b874
Status: Downloaded newer image for oxidized/oxidized:latest
edit ~/.config/oxidized/config
There should now be a config file within your directory which contains the following config:
axians@axians:~/lab-host/oxidized$ cat config
---
username: username
password: password
model: junos
resolve_dns: true
interval: 3600
use_syslog: false
debug: false
threads: 30
timeout: 20
retries: 3
prompt: !ruby/regexp /^([\w.@-]+[#>]\s?)$/
rest: 127.0.0.1:8888
next_adds_job: false
vars: {}
groups: {}
models: {}
pid: "/root/.config/oxidized/pid"
crash:
  directory: "/root/.config/oxidized/crashes"
  hostnames: false
stats:
  history_size: 10
input:
  default: ssh, telnet
  debug: false
  ssh:
    secure: false
  ftp:
    passive: true
  utf8_encoded: true
output:
  default: file
source:
  default: csv
model_map:
  juniper: junos
  cisco: ios
NOW THAT WE HAVE OUR DEFAULT OXIDIZED CONFIGURATION WE CAN PREPARE GITLAB FOR THE NEW SYSTEM.
CREATE USER
If required create a new user for your Gitlab system through Admin > Users > New User and enter the required details.
We will be using an account that is already created so I will be skipping this step.
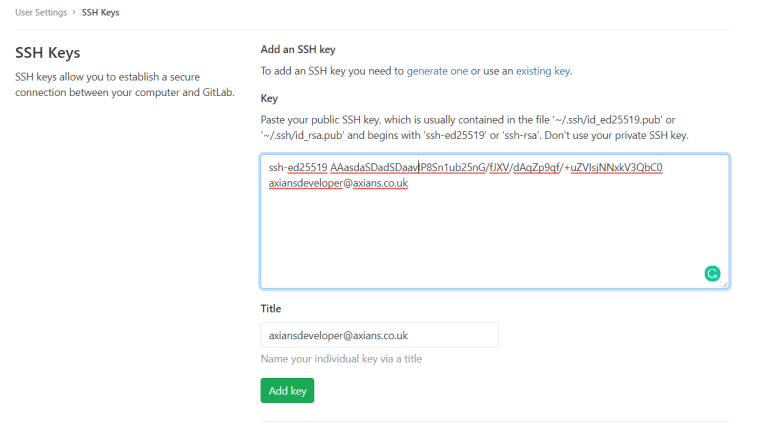
ADD SSH KEYS
Once logged in we need to add SSH keys to the Gitlab account so that Oxidized is able to push changes to repositories. If you dont know how to do this please follow the following tutorial from Gitlab on how to create an SSH Key Pair. Link
This can be done in Settings > SSH Keys
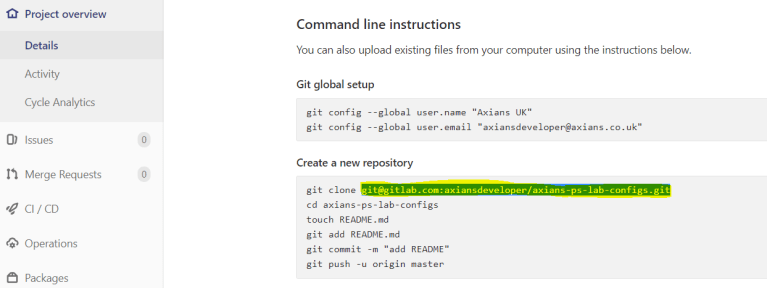
GITLAB PROJECT: CREATE A PROJECT IN ORDER TO STORE THE DEVICE CONFIGURATIONS.
Projects > New Project

Once this is created, navigate to the project page and copy the project url. This is required later.
OXIDIZED CONFIGURATION
BACK ON THE SERVER, EDIT THE FILE CONFIG THAT IS NOW IN THE DIRECTORY YOU CREATED.
We need to change multiple parameters in order to be able to have a functioning configuration file.
The configuration file is in a yaml format. There are a number of key elements that make up this configuration file which are:
- interval – How often to collect data (seconds).
- input – The method to get config from devices.
- output – How to store the configuration.
- source – The data souce for the list of devices.
- model_map – Used to map device groups to models.
- groups – Group specific variables
- models – Model specific variables.
UNDER THE SOURCE SECTION YOU WILL NOTICE THE DEFAUT METHOD IS CSV.
Firstly we need to create a data source file called router.db in our directory.
# /home/axians/lab-host/oxidized/router.db
# name:model:ip
TOR_MGMT_EX2200_B15:junos:192.168.3.35
TOR_MGMT_EX2200_B17:junos:192.168.3.37
TOR_MGMT_EX2200_B18:junos:192.168.3.38
TOR_MGMT_EX2200_B19:junos:192.168.3.39
TOR_MGMT_EX2200_B20:junos:192.168.3.40
TOR_MGMT_EX2200_B21:junos:192.168.9.34
TOR_MGMT_EX4200_B14:junos:192.168.3.34
TOR_MGMT_EX4200_B16:junos:192.168.3.36
I have added some information regarding the information in each column.
We now need to edit the config file so that our source looks like the following:
source:
  default: csv
  csv:
    file: "/root/.config/oxidized/router.db"
    delimiter: !ruby/regexp /:/
    map:
      name: 0
      model: 1
      ip: 2
    gpg: false
Note: the file key value does not match the folders mentioned previously, this is because the final configuration will be run within a docker container to which the configuration file will be mapped.
- file – Location of the source router.db file.
- delimiter – This is a Ruby regular expression to break the csv into columbs based on
:. - map – The map section defines the column number in which to find attributes such as name and IP in the data source.
- gpg – This is to tell Oxidized if the file is encrypted.
TO OUTPUT THE CONFIGURATIONS TO GITLAB WE NEED TO ALTER THE CONFIGURATION FILE SO THAT IT KNOWS HOW TO PUSH THE CONFIGURATION TO THE REPOSITORY.
The required configuration looks like the following:
Note: make sure you replace
axians-ps-lab-configs.gitwith your .git repository name as well as changing the user and email.
output:
  default: git
  file:
    directory: "/root/.config/oxidized/configs"
  git:
    single_repo: true
    user: Oxidized
    email: axiansdeveloper@axians.co.uk
    repo: "/root/.config/oxidized/configs/axians-ps-lab-configs.git"
This config instructs Oxidized to create a bare repo on the local host to store the device configurations.
- file – This tells the application where to put the output configuration
- single_repo – If true Oxidized will only create one repo for all device groups if not a different repo will be used for each device group.
- user – User information to attach to the
git commit. - email- User infromation to attach to the
git commit. - repo – The repo that will have the configuration pushed to.
THE HOOKS SECTION ALLOWS US TO DEFINE THE DETAILS OF THE GITLAB REPO URL FROM THE PREVIOUS STEP.
The configuration below will attempt to push the remote repo when a diff in a devices configuration is detected.
hooks:
  push_to_remote:
    type: githubrepo
    events: [post_store]
    remote_repo: "git@gitlab.com:axiansdeveloper/axians-ps-lab-configs.git"
    publickey: "/root/.ssh/id_rsa.pub"
    privatekey: "/root/.ssh/id_rsa"
- type – This indicates the hook to execute a
git pushto a configuredremote_repowhen the specific event is triggered. - events – There are many events but
post_storeis triggered after a node configuration is stored (this is executed only when the configuration has changed). - remote_repo – The remote repo to be pushed to.
- publickey – public key file path for repository authentication.
- privatekey – private key file path for repository authentication.
THIS IS THE TIME TO EDIT THE CONFIGURATION FILE TO CHANGE USERNAME PASSWORDS ETC TO MAKE SURE IT FITS YOUR ENVIRONMENT.
If you would like to enable the web interface change the rest config to have an IP address of
0.0.0.0which will accept connections from the network.
Resulting configuration:
---
username: axians
password: P@55w0rd
model: junos
resolve_dns: true
interval: 3600
use_syslog: false
debug: false
threads: 30
timeout: 20
retries: 3
prompt: !ruby/regexp /^([\w.@-]+[#>]\s?)$/
rest: 0.0.0.0:8888
next_adds_job: false
vars: {}
groups: {}
models: {}
pid: "/root/.config/oxidized/pid"
crash:
  directory: "/root/.config/oxidized/crashes"
  hostnames: false
stats:
  history_size: 10
input:
  default: ssh, telnet
  debug: false
  ssh:
    secure: false
  ftp:
    passive: true
  utf8_encoded: true

source:
  default: csv
  csv:
    file: "/root/.config/oxidized/router.db"
    delimiter: !ruby/regexp /:/
    map:
      name: 0
      model: 1
      ip: 2
    gpg: false

output:
  default: git
  file:
    directory: "/root/.config/oxidized/configs"
  git:
    single_repo: true
    user: Oxidized
    email: axiansdeveloper@axians.co.uk
    repo: "/root/.config/oxidized/configs/axians-ps-lab-configs.git"

hooks:
  push_to_remote:
    type: githubrepo
    events: [post_store]
    remote_repo: "git@gitlab.com:axiansdeveloper/axians-ps-lab-configs.git"
    publickey: "/root/.ssh/id_rsa.pub"
    privatekey: "/root/.ssh/id_rsa"

model_map:
  juniper: junos
  cisco: ios
RUNNING OXIDIZED
To run the Oxidized in the docker container using the configuration we have created there are two ways, Docker Run and Docker-Compose. Firstly, we will look at Docker Run
DOCKER RUN
To run our Oxidized container we can use the following command:
docker run -v /home/axians/lab-host/oxidized:/root/.config/oxidized -v /home/axians/.ssh:/root/.ssh -p 8888:8888/tcp -t oxidized/oxidized:latest
Note: change the volume mappings to have your folder locations of the configuration and router.db and also the public and private key folder so that Oxidized is able to them for Gitlab authentication
DOCKER COMPOSE
To use docker-compose it must be installed.
We then need to create a file called docker-compose.yml
# /home/axians/lab-host/oxidized/docker-compose.yml
oxidized:
  restart: always
  image: oxidized/oxidized:latest
  ports:
    - 8888:8888/tcp
  environment:
    CONFIG_RELOAD_INTERVAL: 600
  volumes:
    - /home/axians/lab-host/oxidized:/root/.config/oxidized
    - /home/axians/.ssh:/root/.ssh
Once saved we can then run this container with docker-compose up.
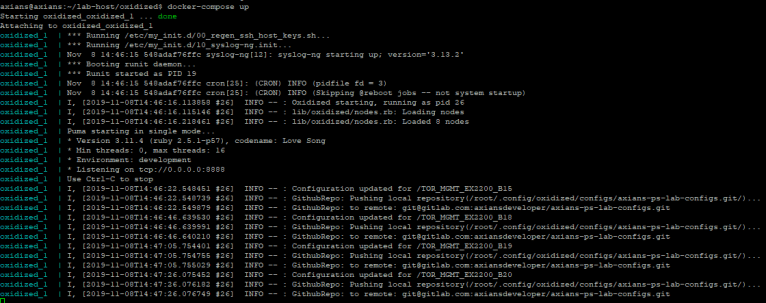
You will see the following output:
To run this headless use docker-compose up -d.
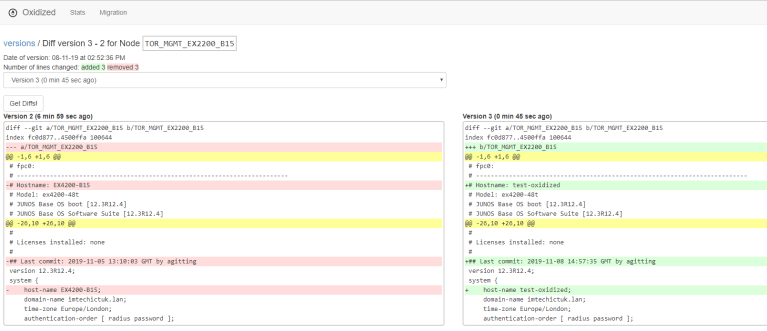
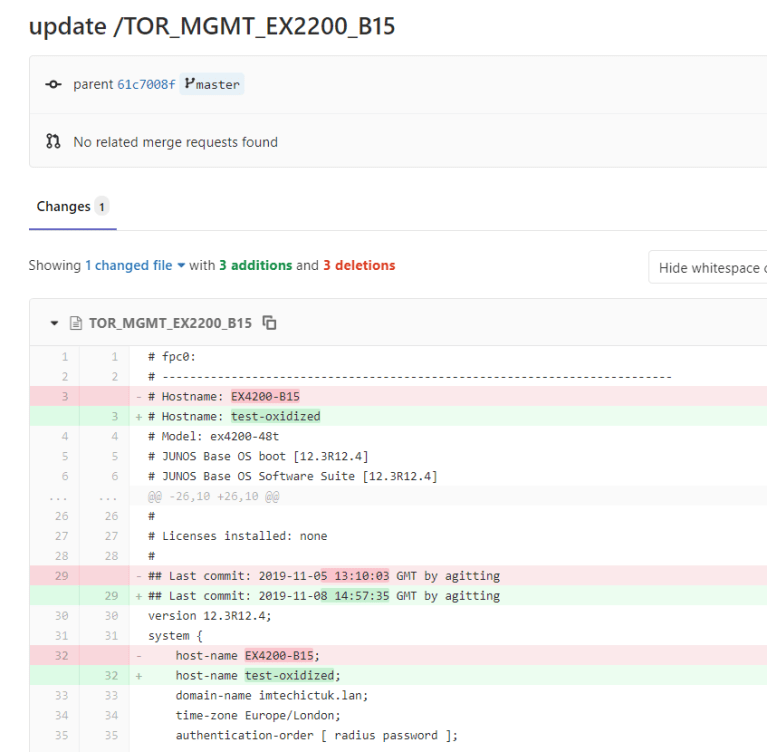
VERIFICATION: NOW THAT THE OXIDIZED IS RUNNING IT WILL BACKUP EVERY HOUR.
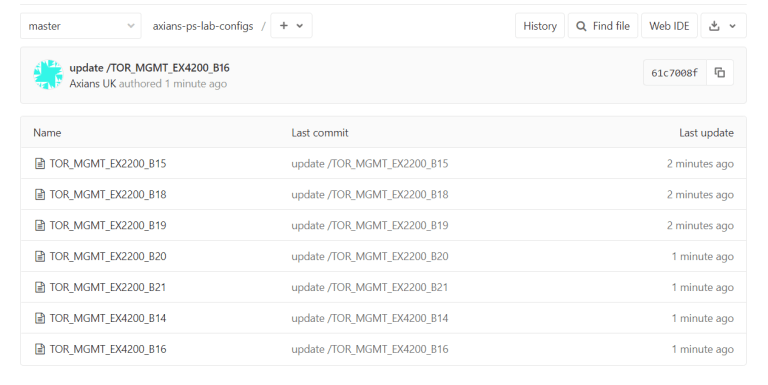
There will be configurations within your Github.
Note: configs will only change when there is a diff.
WEB: IF WE NAVIGATE TO THE HOST IP ADDRESS PORT 8888 WE WILL BE ABLE TO SEE THE OXIDIZED UI.

YOU CAN SEE THE CHANGES AND DIFFS WITHIN THE UI AND ALSO GITLAB WHICH WILL ALLOW YOU TO COMPARE VERSIONS.